概要解説
JavaScript で解説した天気予報 API のサンプルを jQuery で解説していきます。
Ajax は、そのままfetch()で行いますので、主にオブジェクト(json)の取得と DOM 操作のサンプルになります。
天気予報 API スニペット(jQuery 版)
天気予報 API の取得方法と HTML への入力例
本日の天気予報概要の取得と li 要素への入力
最新の天気予報の概要が取得できます。
- publishingOffice(発表機関)
- reportDatetime(発表日時)
- targetArea(対象都道府県)
- headlineText(お知らせ)
- text(内容)
<div class="target"></div>
<script>
	//東海4県のコード番号をオブジェクトの配列にしておきます。
	const codeNums = [{ 愛知県: 23 }, { 岐阜県: 21 }, { 三重県: 24 }, { 静岡県: 22 }];
	//テンプレートリテラルでconst urlに代入します。
	const url = `https://www.jma.go.jp/bosai/forecast/data/overview_forecast/${codeNums[0]['愛知県']}0000.json`;

	fetch(url)
	.then(function (response) {
	  return response.json();
	})
	.then(function (weather) {
	  console.log(weather);
	  $('.target').html('<ul>');
	  $.each(weather, function (key, element) {
			$('.target ul').append(`<li>${element}</li>`)
	  })
	}
	});
</script>
天気予報(今日・明日・明後日・週間)を取得
天気予報(今日・明日※48 時間・週間)を取得できます。
- 今日・明日(48 時間)の天気予報
- 1 週間(7 日間)の天気予報
//東海4県のコード番号をオブジェクトの配列にしておきます。
const codeNums = [{ 愛知県: 23 }, { 岐阜県: 21 }, { 三重県: 24 }, { 静岡県: 22 }];
const weekUrl = `https://www.jma.go.jp/bosai/forecast/data/forecast/${codeNums[0]['愛知県']}0000.json`;

fetch(weekUrl)
	.then(function (response) {
		return response.json();
	})
	.then(function (data) {
		console.log(data);
	});
今日・明日(48 時間)の天気予報
publishingOffice(発表機関)
reportDatetime(発表日時)
timeSeries(48 時間の天気)
- areas(地域)
- area(詳細地域)
- waves(48 時間の波)
- weatherCodes(天気のコード)
- weathers(48 時間の天気)
- winds(48 時間の風)
- timeDefines(6 時間ごとの時間※計 48 時間)
- areas(地域)
今日・明日(明後日)の天気を li 要素で表示します。

<div class="threeDays"></div>
<script>
	const codeNums = [{ 愛知県: 23 }, { 岐阜県: 21 }, { 三重県: 24 }, { 静岡県: 22 }];
	const weekUrl = `https://www.jma.go.jp/bosai/forecast/data/forecast/${codeNums[0]['愛知県']}0000.json`;
	fetch(weekUrl)
		.then(function (response) {
			return response.json();
		})
		.then(function (data) {
			//愛知県西部の天気予報をwest、日付をweatherDateに代入します。
			const west = data[0].timeSeries[0].areas[0];
			const weatherDate = data[0].timeSeries[0].timeDefines;
			$('.threeDays').html(`<h1>${west.area.name}</h1>`).append('<ul>');
			$.each(west.weathers, function (index, element) {
				console.log(weatherDate[index], element);
				$('.threeDays ul').append(`<li>${new Date(weatherDate[index]).getMonth() + 1}月${new Date(weatherDate[index]).getDate()}日:${element}</li>`);
			});
		});
</script>
日付を扱うためには、new Date()を使います。
6 時間ごとの降水率
- pops

<div class="precipitation">
	<table></table>
</div>
<script>
	const codeNums = [{ 愛知県: 23 }, { 岐阜県: 21 }, { 三重県: 24 }, { 静岡県: 22 }];
	const weekUrl = `https://www.jma.go.jp/bosai/forecast/data/forecast/${codeNums[0]['愛知県']}0000.json`;
	fetch(weekUrl)
		.then(function (response) {
			return response.json();
		})
		.then(function (data) {
			const tableElm = $('.precipitation table');
			$(tableElm).before(`<h1>${data[0].timeSeries[1].areas[1].area.name}降水率</h1>`);
			const timeStamp = data[0].timeSeries[1].timeDefines;
			const pops = data[0].timeSeries[1].areas[1].pops;
			$(tableElm).append('<tr>').append('<tr>');
			$.each(timeStamp, function (index, element) {
				const data = new Date(element);
				$(tableElm)
					.children('tr:first')
					.append(`<td>${data.getHours()}時${data.getMinutes().toString().padStart(2, '0')}分`);
				$(tableElm).children('tr:last').append(`<td>${pops[index]}%</td>`);
			});
		});
</script>
天気コードを扱う
気象庁が利用している weathercode については、いろいろなブログで開設されています。
- 気象庁 JSON ファイルにある weatherCode 一覧 │ TEAM T3A
- 気象庁公式の天気予報の情報(JSON)を curl・Node.js で取得し Node.js での処理を試す - Qiita
気象庁|天気予報で Devtools を使って、Forecast.Const.TELOPSと入力してリターンキーを押します。
オブジェクトが表示されますので、右クリックで「object のコピー」でコピーをします。
新規ファイルを作成し「weathercode.js」内にペーストして、const weathercodeに代入します。
そのファイルを<script src="weathercode.js></script>"で読み込んで利用します。
- 天気予報の画像の URL は、
https://www.jma.go.jp/bosai/forecast/img/〇〇.svg

<script src="weathercode.js"></script>
<script>
	const codeNums = [{ 愛知県: 23 }, { 岐阜県: 21 }, { 三重県: 24 }, { 静岡県: 22 }];
	const weekUrl = `https://www.jma.go.jp/bosai/forecast/data/forecast/${codeNums[0]['愛知県']}0000.json`;
		fetch(weekUrl)
			.then(function (response) {
				return response.json();
			})
			.then(function (data) {
				const code = data[0].timeSeries[0].areas[0].weatherCodes;
				$.each(code, function (index, element) {
						console.log(element, weathercodes[element][0])
						$('.threeDays').append(`<img src="https://www.jma.go.jp/bosai/forecast/img/${weathercodes[element][0]}">`)
				})
			}
		});
</script>
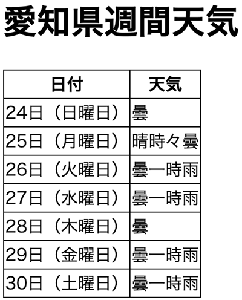
週間(7 日間)の天気予報
天気予報は、weathercode で提供されますので、日付ともに表に追加していきます。

<style>
	table,
	th,
	td {
		border: 1px solid #000;
		border-collapse: collapse;
	}
</style>
<div class="seventh">
	<table>
		<tr>
			<th>日付</th>
			<th>天気</th>
		</tr>
	</table>
</div>
<script>
	const codeNums = [{ 愛知県: 23 }, { 岐阜県: 21 }, { 三重県: 24 }, { 静岡県: 22 }];
	const weekUrl = `https://www.jma.go.jp/bosai/forecast/data/forecast/${codeNums[0]['愛知県']}0000.json`;
	fetch(weekUrl)
		.then(function (response) {
			return response.json();
		})
		.then(function (data) {
			const weekly = data[1].timeSeries[0].areas[0].weatherCodes;
			const weeklyDate = data[1].timeSeries[0].timeDefines;
			const dayarray = ['日曜日', '月曜日', '火曜日', '水曜日', '木曜日', '金曜日', '土曜日'];

			$('.seventh table').before(`<h1>${data[1].timeSeries[0].areas[0].area.name}週間天気</h1>`);
			$.each(weekly, function (index, element) {
				console.log(weekly);
				const dates = new Date(weeklyDate[index]).getDate();
				const days = dayarray[new Date(weeklyDate[index]).getDay()];
				const weather = weathercodes[weekly[index]][3];
				$('.seventh table').append(`<tr><td>${dates}日(${days})</td><td>${weather}</td>`);
			});
		});
</script>
随時、追記・編集していきます。
その他
- 参考:気象庁 JSON データ - Qiita
- 参考:Common Lisp で天気予報スクリプトを作ってみた〜気象庁編〜 - JPDEBUG.COM
- precipAverage(降水量の 7 日間合計の「向こう一週間(明日から7日先まで)の平年値)
- tempAverage(最低、最高気温の「向こう一週間(明日から7日先まで)の平年値)